Thursday, 25 November 2010

Alex Legg - 3D Environment Artist

Alex Legg is an environment artist for Rockwell Collins, he has a degree in Computer Animation and uses Maya, 3Ds Max, Mudbox, Unreal Ed and Crazybump. I have an interest in his work because I am trying to learn the best techniques in creating low-ploy.
High and low resolution models made in 3Ds Max
Diffuse, Normal, Specular and Occlusion maps.

Alex created this model using a tutorial from Eat3D. The low resolution model 1500 polys and 2000 tris, the distribution of tris on the model are well controlled and texture maps are well made and effective, I think I could learn a lot from using the same tutorial.
All image of Alex legg’s work taken from http://www.alex-legg.co.uk/environments/index.html#pillars

Here is an in game image of the model in the Unreal engine. From looking at this model I can see the benefit of creating looks of separate model assets to create a room instead of multiple or all assets in one go. By creating multiple objects I will have more control over creating maps that suit different surfaces and will being able to gain a higher resolution.

Thursday, 18 November 2010

3Ds Max - Lantern Model

Here is a lantern model I created using this great tutorial from cg.tutsplus.com. The model took me about a week to make and along the way I learnt some very valuable skills which include, UV mapping sub-divided geometry, pelt mapping, Diffuse mapping, specular mapping and more.
This model has a too high poly count to add to Unity, but I might possibly bake it down to a low-poly model to add it to my game Rove if the model fits with the aesthetic of the game.

Monday, 15 November 2010

3Ds Max - Pelt Mapping

Pelt Mapping is a great technique which I have just learnt, I have found that since I have learnt this technique I use it for 80% of the mapping work I do on models. First of all I apply a UVW Unwrap modify to my model in the modify tab. I then select faces and click the Point To Point Seam button, this tool allows me to cut up my model into different sections to be mapped. To do this I can use the Point To Point Seam tool to select edges to separate up sections of polygons. Example below, the seams I have created are marked blue.
After I have marked out the sections of the model I want to map I select one of the faces of a section I want to map and select Exp. Face Sel To Seams, this selects all the faces on the section I want to map. I then click Pelt. Which brings me up with the Pelt menu.
Faces before pelt

 I click Pelt which stretches and unfolds the sections of faces along the seams I had selected with the Point To Point Seam tool.
Faces after pelt

I Then select Relax which relaxes the faces and brings the faces into proportion.
Faces after Relax

Saturday, 6 November 2010

3Ds MAX - Extrude Along Spline

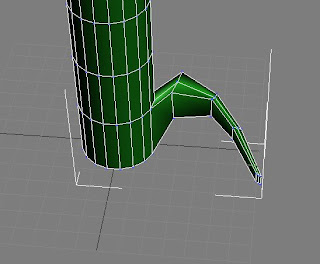
This is a useful technique I have learnt which is especially helpful when creating trees models. First of all I create a tall cylinder which will be the trunk of my tree.
I then go to Create - Objects and select the line tool. Go to the Top view port and create a line of four vertex points in a rough shape and direction I want for the roots of my tree. I then go back to the Perspective view and adjust the vertex points again.
As you can see I move the line so that it touches the model and is roughly in-between two polygons. I then select these two polygons and select Extrude Along Spline (I click the menu button for this function which is a small small square that is next to the functions name) and select Pick Spline, then I select the line I had created that is touching the selected polygons. Polygons now extrude from the cylinder model along the line. I then adjust the Segments, Taper Amount and Taper Curve opens in the Extrude Polygons Along Spline menu accordingly to get the effect of a tree root.
By using this technique many times over on this model, adjusting the options of the Extrude Polygons Along Spline menu for each extrude to add variety I can create a basic complex tree model within minutes. Below is the final result after half an hour.