Thursday, 25 November 2010

Alex Legg - 3D Environment Artist

Alex Legg is an environment artist for Rockwell Collins, he has a degree in Computer Animation and uses Maya, 3Ds Max, Mudbox, Unreal Ed and Crazybump. I have an interest in his work because I am trying to learn the best techniques in creating low-ploy.
High and low resolution models made in 3Ds Max
Diffuse, Normal, Specular and Occlusion maps.

Alex created this model using a tutorial from Eat3D. The low resolution model 1500 polys and 2000 tris, the distribution of tris on the model are well controlled and texture maps are well made and effective, I think I could learn a lot from using the same tutorial.
All image of Alex legg’s work taken from http://www.alex-legg.co.uk/environments/index.html#pillars

Here is an in game image of the model in the Unreal engine. From looking at this model I can see the benefit of creating looks of separate model assets to create a room instead of multiple or all assets in one go. By creating multiple objects I will have more control over creating maps that suit different surfaces and will being able to gain a higher resolution.

Thursday, 18 November 2010

3Ds Max - Lantern Model

Here is a lantern model I created using this great tutorial from cg.tutsplus.com. The model took me about a week to make and along the way I learnt some very valuable skills which include, UV mapping sub-divided geometry, pelt mapping, Diffuse mapping, specular mapping and more.
This model has a too high poly count to add to Unity, but I might possibly bake it down to a low-poly model to add it to my game Rove if the model fits with the aesthetic of the game.

Monday, 15 November 2010

3Ds Max - Pelt Mapping

Pelt Mapping is a great technique which I have just learnt, I have found that since I have learnt this technique I use it for 80% of the mapping work I do on models. First of all I apply a UVW Unwrap modify to my model in the modify tab. I then select faces and click the Point To Point Seam button, this tool allows me to cut up my model into different sections to be mapped. To do this I can use the Point To Point Seam tool to select edges to separate up sections of polygons. Example below, the seams I have created are marked blue.
After I have marked out the sections of the model I want to map I select one of the faces of a section I want to map and select Exp. Face Sel To Seams, this selects all the faces on the section I want to map. I then click Pelt. Which brings me up with the Pelt menu.
Faces before pelt

 I click Pelt which stretches and unfolds the sections of faces along the seams I had selected with the Point To Point Seam tool.
Faces after pelt

I Then select Relax which relaxes the faces and brings the faces into proportion.
Faces after Relax

Saturday, 6 November 2010

3Ds MAX - Extrude Along Spline

This is a useful technique I have learnt which is especially helpful when creating trees models. First of all I create a tall cylinder which will be the trunk of my tree.
I then go to Create - Objects and select the line tool. Go to the Top view port and create a line of four vertex points in a rough shape and direction I want for the roots of my tree. I then go back to the Perspective view and adjust the vertex points again.
As you can see I move the line so that it touches the model and is roughly in-between two polygons. I then select these two polygons and select Extrude Along Spline (I click the menu button for this function which is a small small square that is next to the functions name) and select Pick Spline, then I select the line I had created that is touching the selected polygons. Polygons now extrude from the cylinder model along the line. I then adjust the Segments, Taper Amount and Taper Curve opens in the Extrude Polygons Along Spline menu accordingly to get the effect of a tree root.
By using this technique many times over on this model, adjusting the options of the Extrude Polygons Along Spline menu for each extrude to add variety I can create a basic complex tree model within minutes. Below is the final result after half an hour.

Thursday, 28 October 2010

Unity - Particle Physics

To create a particle physics system in Unity I go to GameObject - Create Other - Particle. This applies a particle system to my unity scene.
From the Inspector menu I can adjust the variables of the particle system to suit an effect of my choice. For this blog post I will create a rising flame. To do this I go to the Particle Renderer script in the inspector menu and double click on Materials - default elements section. This brings a new window within the Inspector menu which allows me to change the textures of the particle system. From here I select Flame D which is a particle texture that comes with the Unity software, this now changes the textures that the particle system generates.
Now I can adjust the variables of the particle system to get the effect of a rising flame. To do this I change the Max Size to 1 (this adds a variety to the size of the particles being emitted) , the World Velocity to 5 on the Y axis (this sends the up the Y axis to a factor of 2), the Local Velocity to 1 (this adds a sway to the particles direction which gives the effect of the particles being swayed by the wind) and finally the under the Local Rotation Axis - Size Grow to 1. Below is the result.

Sunday, 24 October 2010

Importing models into untiy

Unit set-up
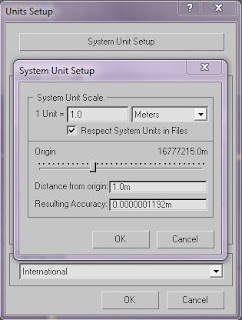
Before I begin modelling anything in 3DS MAX which I intend to import into Unity I go to Customize - Unit setup, then click the System Unit Set-up tab which brings me up with this menu.
I set my Unit Scale to 1.0 and Meters, this helps me to keep my models in scale for example height of walls and the size of rooms. This is important because when I import multiple models into unity they will piece together perfectly without having to spend time scaling them to fit together.

Here is a basic model of two planes I created which I have applied a texture and a basic bump map.

 Model

Render


Now I open Unity and create a new project saving it to My Documents. Back in 3DX MAX I save my model to the the assets folder with in my Unity project folder. I also create a new folder with in the assets folder naming it textures and copy and paste my model texture and bump map to it.


Now when I go back to Unity my model and textures have been imported to my project tab.

Now I tick Collision Colliders and select Don't Import on the Animations Generation tab and click apply.

Now I can just drag and drop my model from the Projects tab to my scene. After that I click each plane in the Hierarchy tab. This give me the option to apply my textures to the model. I select an extra Shader option on the Shader tab and select Bumped_Diffuse. This applies another texture option below to put my bump map into. I select my textures in the 2D texture tabs and select the tiling to 3.0 on the X and Y axis of each texture, this is the result.

My model is now imported into Unity, now to add some lighting I go to GameObject - Create Other and create a Directional Light and a Point light, position them to bring out my textures and here is the final result of my 3DS MAX to Unity import test.

Friday, 22 October 2010

Team Discussion - Extension on Concept

After a lengthy team discussion and a mutual interest of narrative concepts Andrew and I have decided that an aspect of narrative would be a great addition to our concept. Our idea is to create a narrative first and then base our research and concepts around the back story of our game idea. The reason for this is because we are both very interested in creating our 3D concepts as not just interesting and aesthetically pleasing designs but to also have them act as plot devices. So a question I need to ask myself throughout the next three weeks of research is, how can I create 3D environment features that tell a story?